I’m posting the recipe and step-by-step instructions for making the chocolate plastic roses. Maybe someone will find this information useful. I really do like the chocolate plastic as the cake decor. It is easy to work with, looks great, holds its shape, and it is way tastier than fondant. Of course, you can make different things from the plastic, just use your imagination.
Makes enough to make about 4-6 large flowers
Ingredients:
- 8 oz white (or milk) chocolate, finely chopped
- ¼ cup (4 tbsp) light corn syrup
Important note: The milk chocolate can be substituted for the white. But if you wish to make the flowers from the dark (bittersweet or semisweet) chocolate, use a different proportion: for every pound of the dark chocolate, take 2/3 cup of the light corn syrup. Preparation is the same.
Preparation:
Bring 1 inch of water to a simmer in a wide skillet. Turn the burner off (if your stove is electric, remove the skillet from the burner) and wait for 30 seconds. Meanwhile, place the chocolate in a medium heatproof bowl. Set the bowl of chocolate in the hot water. Stir constantly until the chocolate is melted and smooth.
Off the heat; add the corn syrup and stir with a wooden spoon until the mixture thickens and pulls away from the sides of the bowl.
Transfer the chocolate mixture onto a piece of plastic wrap and pat it into a thin disk, about 6 mm thick. Fold the plastic wrap over the chocolate and refrigerate for at least a couple of hours or up to several weeks (check the expiration date on your chocolate). It is preferable to let the chocolate plastic rest in the refrigerator overnight.
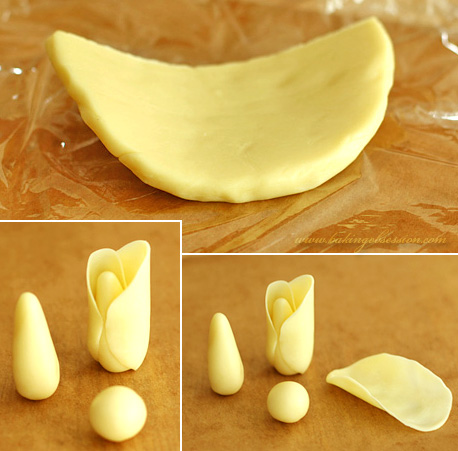
Take the chocolate plastic out of the refrigerator. Leave it on a counter for 30 minutes to soften slightly. Knead the plastic with your hands to make it smooth and pliable before you start (it might appear grainy at first, but the kneading will change it).
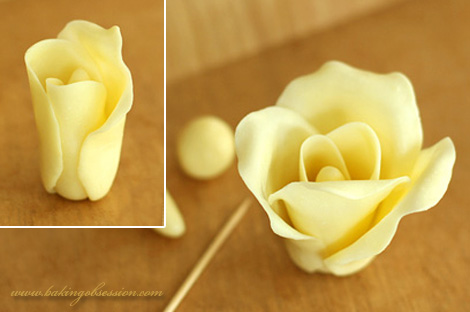
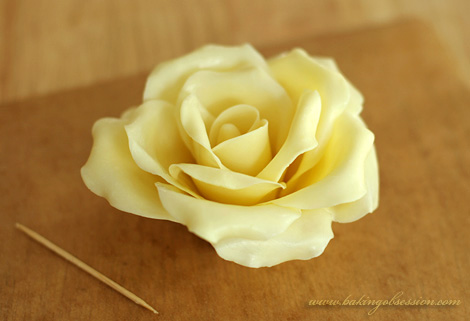
Shape a small piece of the chocolate plastic into a cone – it will be a flower base. Then form another piece into a small ball (about ½-inch in diameter) rolling it in the palms of your hands. Pat the ball, between two plastic bags (like Ziploc), or between two layers of plastic wrap, into a thin petal. Refrigerate the petal, still between the plastic wrap, for a minute (to firm the chocolate plastic and make it easier to handle). While one petal is chilling, form another one for the continuous process. Take the chilled petal out of the fridge. Carefully peel the plastic wrap and attach the petal to the cone base. Wearing thin, surgical-type gloves helps significantly. Attach another petal to the base overlapping the petals slightly. Make the closed bud first, then start attaching the open petals around. Curve the petal edges gently outward using a toothpick. Repeat the shaping, chilling, and overlapping the petals until you get the desired size and shape of the flower.
Refrigerate the finished chocolate rose until firm, cover loosely with plastic wrap and keep in the fridge until needed.
You probably won’t use all plastic at once (it makes a lot). If you have some leftovers, invite the kids into the kitchen. They love this edible chocolate play-dough.

June 23, 2009 at 9:17 pm
Denise, yes, you can use wire.
June 23, 2009 at 9:10 pm
Question….what is the best way to “attach” the roses to buttercream icing? I would like to cascade the roses down the side of a wedding cake. Can I use wire the way it is used for gumpaste roses?
June 9, 2009 at 9:23 am
MJ, sorry I missed your comment. No, you can’t use honey instead. But you can use liquid glucose.
Hyria, thank you!
June 5, 2009 at 11:29 am
This is absolutely amazing!!! This looks like a real rose, if I didn’t know I’d probably think that it was a really pretty rose lol. I’m amazed at how people can make these beautiful decorations and put it on their beautiful cakes. Thank you :D
April 25, 2009 at 6:21 am
Wow, your work is amazing! It’s incredible that those flowers are edible but I’m not sure if I would be able to. They’re so pretty!
I was wondering, is there anyway I can substitue the light corn syrup with honey?
April 23, 2009 at 11:32 pm
Kerry, thank you very much for sharing the recipe! And good luck with your project! I can easily imagine how beautiful and delicious this cake will be.
April 23, 2009 at 10:35 am
should’ve said this will yield 2.5 kg when done
April 23, 2009 at 5:10 am
Hi i love your rose, i am in the process of making 7kg of white chocolate plastique for a wedding cake next week! This is the first time i have used it and i love it. My recipe is slightly different so i thought i would share it, i am in essex, england.
1.75 kg white chocolate
4oz cocoa butter ( order online)
14oz glucose syrup
10fl oz stock syrup ( recipe 9fl oz water,5oz castorsugar 3oz glucose syrup, put in pan bring to boil,take off heat and cool)
melt choc over pan of water
melt cocoa butter in microwave on medium heat
(do seperately as they have different melting temps)
when both melted mix together and stir till combined.
mix stock syrup and glucose together, warm slightly so all ingredients similar temp.
pour chocolate over glucose mix and stir with wooden spoon till smooth.
put in large ziplock freezer bag and allow to set at room temp. for 24 hrs.
this can be chilled in fridge, but take out 30 mins prior to use!
Thanks for sharing your rose, i have to make them too and yours is a great step by step..viva la chocolate!!!!
April 22, 2009 at 9:19 pm
Arlette, thank you very much! You are too kind :)
April 22, 2009 at 8:50 am
hello Vera,
I am speechless……gorgeous work
April 12, 2009 at 10:29 am
Ken, thank you very much!
Nevene, thank you very much! 16 oz (1 lb) of dark chocolate will require 2/3 cup of corn syrup; 8 oz will need 1/3 cup of corn syrup respectively.
April 12, 2009 at 2:21 am
Amazing, was searching all day for this. Just a quick question, I am confused about the measurements for using dark chocolate, can you break it down in ounces?
Thanks again, absolutely amazing.
April 11, 2009 at 11:01 am
Your rose is stunning!!! I hope mine looks as beautiful as yours =)
March 23, 2009 at 9:07 am
Mara, sure they are edible. They will taste like the chocolate you use. The texture is different from pure chocolate though; it’s somewhat chewy. So, I would recommend to eat such rose petal by petal and not to bite into the whole flower.
March 23, 2009 at 8:44 am
Hi, I have been asked to do some wedding favors (white chocolate roses) and I wanted to do something a little different so my question is: Is this edible..does it taste good like a white chocolate piece of candy would taste? I really like the way the roses came out. Please help running out of time..
March 3, 2009 at 8:38 pm
Glow, thank you for your tip!
March 3, 2009 at 7:07 am
Hello, firstly thank you for this! also, I live in the UK where corn syrup is quite hard to come across and I thought it might be useful to let you know that you can use the same quantity of glucose syrup and it works perfectly.
Hope that’ll help!
February 12, 2009 at 3:38 pm
Thanks for all your help! =) It’s been about 8 hours already. I’m going to take it out and start on sculpting the rose now.
February 12, 2009 at 1:23 pm
Rayner, I wouldn’t do it. Be patient :)
February 12, 2009 at 12:17 pm
I see. Haha. I’ve put the chocolate in the fridge a few hours ago. Is it alright to put it in the freezer for a faster process?
February 11, 2009 at 9:38 am
Rayner, thank you! The shaping is not difficult at all; I find it rather soothing :) Good luck!
February 11, 2009 at 6:34 am
Wow, the rose you made is amazing and really beautiful. Just wondering whether the shaping of the rose is difficult? I’ve already bought the ingredients for it and hoping to complete before valentines day. I’m a total newbie at making chocolates. It’s kinda my first time.
January 28, 2009 at 2:18 pm
these are stunning!! thank you so much for the step-by-step instructions and beautiful photos! :)
January 18, 2009 at 12:18 pm
Sharron, thank you! They can be made well in advance. I would say – a couple of weeks in advance, maybe even longer if you keep them in an air tight container in the refrigerator. The fridge is a good dehydrator, so, if you don’t store the plastic decor properly, it will become brittle and break easily.
January 18, 2009 at 8:15 am
Hi Vera!
Your roses are the nicest I’ve seen–just gorgeous!
Do you know how far in advance of using the roses they can be made?
Thanks for your help.
Sharron
January 11, 2009 at 8:51 pm
Hi,
Wow, your reply is fast, I think I’m bless with good luck, hee hee! Thanks again.
January 11, 2009 at 6:36 pm
Queen butter, you’ve got it absolutely right. Good luck!
January 11, 2009 at 5:44 pm
Hi,
I bought a bottle of light corn syrup to try out this recipe.
I just want to confirm with you that I should remove the bowl of melted chocolate from the hot water and set aside, then add in light corn syrup and stir?
I will be waiting for your reply, thank you.
Regards,
Queen butter
December 16, 2008 at 3:37 pm
You are a genius. I have been looking for a step by step instructions on how to make chocolate roses since forever, and here you are with your wonderful blog and your simple steps! I will definitely try this for the Christmas cakes… thank you again!
October 22, 2008 at 11:36 am
Thank you so much for posting this! I can’t wait to try it1
Hanna
September 25, 2008 at 9:55 pm
Praniti, I don’t think your recipe will work as a substitution. But Thip on her wonderful blog posted a different recipe including glucose. Go and check http://thai4real.blogspot.com/2008/04/modeling-couverture.html
September 25, 2008 at 12:52 am
Heya…These roses look yummy! I would love to try them but I can’t find corn syrup anywhere here in India … :-(
Do you think I could substitute it with anything? On the net I found a corn syrup substitute (1 1/4th cup sugar + 1/3rd cup water) … Will this work …?
Hope to make these roses soon! :)
Thanks.
September 14, 2008 at 10:19 pm
Anne, thank you very much, you are too kind! I’ll be so glad if you let me know how it turns out. Good luck!
September 13, 2008 at 8:18 pm
You are a star! thankyou so much for posting these and esp the pictures too! There are other sites which tell you how to make it but pictures are the aid of the whole process, good on you! i shall feedback once i finish it for my boyfriend’s birthday cake!
cheers!
August 18, 2008 at 9:50 pm
Natalie, thank you very much. I emailed you.
August 16, 2008 at 9:21 am
Thanks alot for the tutorial .This is magnificent. I love your blog. Is it possible to use a substitute for corn syrup since its not available where i live. wish to try this tutorial.Thanks
August 2, 2008 at 10:56 pm
Ellen, you are very welcome. And good luck with the wedding cake! Congratulations (if it’s your wedding)!
August 2, 2008 at 3:08 am
Thanks so much for your reply Vera – very helpful
July 26, 2008 at 1:30 pm
Ellen, you can keep it in a fridge for a long time. Check the expiration date on your chocolate to be safe, and keep the plastic as long as your chocolate is OK.
July 26, 2008 at 1:14 pm
Does anyone know how long you can keep white chocolate plastique for after you have made it? I am covering my wedding cake with it (in 5 weeks) and want to make it as soon as possible…
thanks very much
July 17, 2008 at 4:40 pm
Thanks very much. Will try to make this. The rose is wonderful.
June 27, 2008 at 11:38 pm
Hi Noa,
I’m really glad you found this post useful. I don’t mind at all linking to my blog.
June 27, 2008 at 11:19 pm
Hi Vera,
This is my first comment, but I became a reader of your blog early this month. This chocolate rose is stunning! I was so glad to find this post because I’ve been waiting for somebody to show me how to make one like this! I printed out this page and tried to make one too.
Vera, would you mind me linking your blog to mine?
June 4, 2008 at 9:43 pm
Rachel, you are right, these taste way better than the fondant. Although people usually prefer to look at them rather than eat them. Nobody wants to “ruin” it.
Laurie, Debyi, you are very welcome!
June 2, 2008 at 8:23 pm
Thank you so much for posting this. Your rose is so beautiful, I can’t wait to try it.
May 31, 2008 at 9:57 am
I could just hug you for posting how to do these roses!! Awesome.. :)
Thanks!!
May 29, 2008 at 7:07 am
HI… im a student in wallingford and im doing a profolio on chocolate and we have to find a blog. This really intrests me because i think its a great idea. I always watch the cooking shows and the fondue that they put on cakes never looks like it would taste good. But this actually looks like i would want to eat it .
May 29, 2008 at 1:30 am
you know have some chocolate plastique sitting in my kitchen right now…i made it a while back and didn’t even think to use it for this cake!
May 28, 2008 at 11:11 pm
Holly, I’ve never made bright colored decorations myself. I used rather a combination of three natural chocolate colors. I’m not sure about colored chocolate melts, but adding a few drops of oil-based food coloring to the white chocolate plastic can certainly work.
May 28, 2008 at 8:38 pm
Thanks for giving the directions! This is absolutely beautiful! Do you know if there is a way to use colored “candy melts” for colored versions – or I guess if there is a way to make a colored version.