October Daring Bakers’ challenge was pizza, to be precise – Peter Reinhart’s wonderful pizza crust. To make it challenging enough, we were supposed to master the tossing technique. Although, it is definitely fun and adrenalin-releasing experience I prefer to stretch my dough on the fists letting the gravity to do its work. This way, the desirable thicker edges and very thin center are easily achieved.
We were required to take a picture of the flying dough in the air. Unfortunately, this historical (I mistyped “hysterical”, first :) moment couldn’t be captured – there was no qualified adult around to take such shot. You will have to believe my words that the dough was not just tossed in the air but even successfully caught. And I lie very seldom.
I have a tendency to overdo the fillings and toppings. And there’s an explanation for this. I still remember my nana teaching me how to make a cabbage pie and whispering: ”If you don’t put enough filling, dear, people will think you are cheap. Without the filling, the pie is just a bread crust. And you don’t invite guests over for a slice of a regular bread.” Who ever questions nana’s opinion? So, if you have the same issues with the fillings/toppings as I do, we (Peter Reinhart and I :) must warn you. Do not overtop your pizza! Be moderate with your toppings no matter how good they are.
My big thank you to Rosa, this month DB’ host! We all enjoyed it a lot!
Sautéed Apple and Crispy Cinnamon Streusel Pizza

In this one, I topped the unbaked crust with thinly sliced and sautéed in butter and brown sugar apples, with an addition of cardamom, cinnamon, nutmeg, and lemon/orange zest. The streusel, on contrary, wasn’t baked with the pizza. I made the crumbs ahead of time and sprinkled over the pizza top as soon as it came out of the oven. Someone might think it’s a cheating; I believe it’s a practical solution ensuring the perfectly crisp and nicely brown streusel crumbs (that’s how I always top my fruit crisps, by the way). I served the hot pizza with sour cream.
Roasted Garlic and Sun-Dried Tomato Pizza with Roasted Onions, Red Peppers and Feta
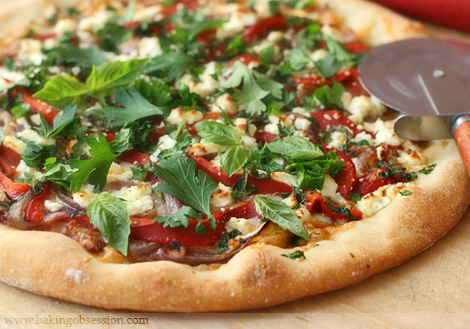
This is a savory one. Instead of a tomato sauce, I pureed the sundried tomatoes and roasted garlic with a bit of extra-virgin olive oil, and spread it over the crust. The next went grated mozzarella, followed by the thickly sliced and previously roasted red onions, grilled sweet red peppers, and crumbled feta. The whole thing was topped with fresh basil and parsley.
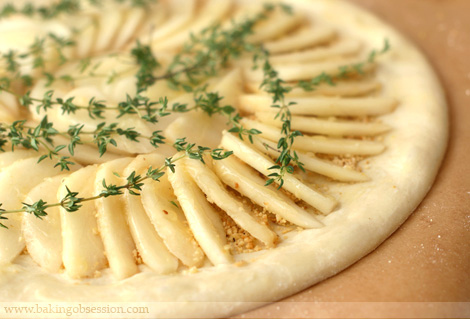
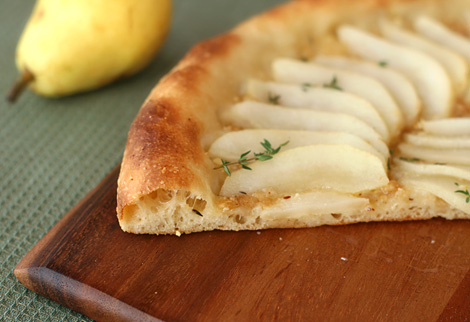
Hazelnut and Honey-Thyme Roasted Pear Pizza
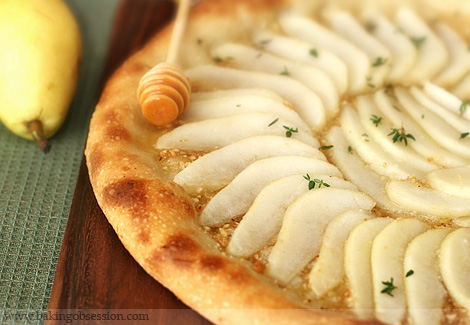
I baked the third pizza the following day when my dear and so very much nut allergic son was at school. First, I generously sprinkled the crust with toasted, coarsely ground hazelnuts. The second deck was peeled and thinly sliced Bartlett pears. I brushed the crust and pears with melted butter, drizzled the honey over the pears. Then I topped the pears with thyme sprigs. The time spent in the oven was sufficient enough to flavor but not to overpower the pears with thyme. As soon as the pizza was done, I brushed the pears with a little bit more warmed honey and sprinkled with some fresh thyme. It was delicious. Well, without excessive modesty, the all three pizzas tasted pretty much fantastic :)
Makes 3 large (about 13-inches), or 4 medium, or 6 small pizzas
For the dough:
- 4½ cups (20¼ oz or 607.5 g) unbleached high-gluten (14%) bread flour or all purpose flour, chilled
- 1¾ tsp salt
- 1 tsp instant yeast
- ¼ cup (2 oz or 60g) extra virgin olive oil
- 1¾ cups (14 oz or 420ml) water, ice cold (40°F/4.5°C)
- 1 tbsp sugar
- Semolina/durum flour or cornmeal for dusting
Day One:
Mix together the flour, salt and instant yeast in a big bowl (or in the bowl of your stand mixer).
Add the oil, sugar and cold water and mix well (with a large wooden spoon or with the paddle attachment of the mixer, on low speed) in order to form a sticky ball of dough. On a lightly floured surface, knead for about 5-7 minutes, until the dough is smooth and the ingredients are homogeneously distributed. If it is too wet, add a little flour (not too much, though) and if it is too dry add 1 or 2 teaspoons extra water. If you are using the electric mixer, switch to the dough hook and mix on medium speed for the same amount of time. The dough should clear the sides of the bowl but stick to the bottom of the bowl. If the dough is too wet, sprinkle in a little more flour, so that it clears the sides. If, on the contrary, it clears the bottom of the bowl, dribble in a teaspoon or two of cold water. The finished dough should be springy, elastic, and sticky, not just tacky, and register 50°-55°F /10°-13°C.
Flour a work surface or the counter. Line a jelly pan with parchment. Lightly oil the parchment paper.
With the help of a metal or plastic dough scraper, cut the dough into three equal pieces (or, more if you want to make smaller pizzas). To avoid the dough from sticking to the scraper, dip the scraper into water between cuts.
Sprinkle some flour over the dough. Make sure your hands are dry and then flour them. Gently round each piece into a ball. If the dough sticks to your hands, then dip your hands into the flour again.
Transfer the dough balls to the lined jelly pan and mist them generously with spray oil. Slip the pan into plastic bag or enclose in plastic food wrap.
Put the pan into the refrigerator and let the dough rest overnight or for up to thee days.
NOTE: You can store the dough balls in a zippered freezer bag if you want to save some of the dough for any future baking. In that case, pour some oil (a few tablespoons only) in a medium bowl and dip each dough ball into the oil, so that it is completely covered in oil. Then put each ball into a separate bag. Store the bags in the freezer for no longer than 3 months. The day before you plan to make pizza, remember to transfer the dough balls from the freezer to the refrigerator.
Day Two:
On the day you plan to eat pizza, exactly 2 hours before you make it, remove the desired number of dough balls from the refrigerator. Dust the counter with flour. Place the dough balls on the floured surface and sprinkle them with flour. Dust your hands with flour and delicately press the dough into disks about ½ inch (1.3 cm) thick. Sprinkle with flour. Loosely cover the dough rounds with plastic wrap and then allow to rest for 2 hours.
At least 45 minutes before making the pizza, place a baking stone on the middle rack of the oven. Preheat the oven as hot as possible, to 500° F (260° C).
If you do not have a baking stone, then use the back of a jelly pan. Do not preheat the pan. Generously sprinkle the back of a jelly pan with semolina/durum flour or cornmeal.
If you have the stone, prepare a peel for transferring the pizza to the oven by dusting the peel with semolina or cornmeal. If you don’t have the peel but do have the baking stone, use a rimless cookie sheet instead. Line the sheet with parchment, dust the parchment with semolina/cornmeal. I do use parchment paper. It’s so much easier to slide the assembled pizza into the very hot oven directly on the parchment, as well as to take the baked pizza out of the oven.
Have the toppings ready.
Flour your hands (palms, backs and knuckles). Take 1 piece of dough by lifting it with a pastry scraper. Lay the dough across your fists in a very delicate way and carefully stretch it by bouncing it in a circular motion on your hands, and by giving it a little stretch with each bounce. Once the dough has expanded outward, move to a full toss (this is an optional step). You can successfully stretch the dough without tossing it into the air. Aim to get a thin dough with thicker edges.
NOTE: Make only one pizza at a time.
During the tossing process, if the dough tends to stick to your hands, lay it down on the floured counter and reflour your hands, then continue the tossing and shaping.
In case you would be having trouble tossing the dough or if the dough never wants to expand and always springs back, let it rest for approximately 5-20 minutes in order for the gluten to relax fully, then try again.
You can also resort to using a rolling pin, although it isn’t as effective as the toss method.
When the dough has the shape you want, place it on the prepared back of the jelly pan, or the parchment-lined rimless baking sheet making sure there is enough semolina/durum flour or cornmeal to prevent sticking.
Lightly top it with sweet or savory toppings of your choice.
NOTE: Remember that the best pizzas are topped not too generously. No more than 3 or 4 toppings (including sauce and cheese) are sufficient.
Slide the garnished pizza directly on the parchment onto the stone in the oven, or (if there is no stone) bake directly on the back of the jelly pan. Close the door and bake for about 8-10 minutes.
While the first pizza is cooking, repeat the shaping with the another dough round.
Take the pizza out of the oven and transfer it to a cutting board or your plate. In order to allow the cheese to set a little, wait 3-5 minutes before slicing or serving.
For the Apple and Cinnamon Streusel Pizza:
For the streusel:
- ½ cup + 2 tbsp all-purpose flour
- ¼ cup granulated sugar
- ¼ tsp cinnamon
- 1/8 tsp (pinch) salt
- 4 tbsp (1/2 stick) cold unsalted butter, cubed
For the sautéed apples:
- 3 tbsp unsalted butter
- ¼ cup packed golden brown sugar
- 4 large apples (I used Gala), peeled, cored, halved and thinly sliced crosswise
- Zest of 1 small orange
- Zest of ½ lemon
- 1 tsp cinnamon
- Scant ¼ tsp cardamom
- Scant ¼ tsp nutmeg
- About 1 tbsp unsalted butter, melted (for brushing the crust before baking)
- About 1 tbsp Demerara sugar for sprinkling
Make the Apple and Cinnamon Streusel Pizza:
Make the streusel topping:
In a medium bowl, combine the flour, sugar, cinnamon, and salt. Add the cubes of cold butter and work them into the flour using a pastry blender or your fingers (my preference here) until the mixture is crumbly.
Line a large baking sheet with parchment or a silicone mat and sprinkle the crumbs over the sheet. Transfer into the refrigerator while the oven is preheating.
Center an oven rack and preheat the oven to 350F.
Bake the streusel crumbs for about 12 minutes, until they are light golden. Gently stir the crumbs and bake for another 5-6 minutes until nicely browned.
Cool on the baking sheet on a rack. Leave on the sheet if you plan to assemble the pizza the same day. The streusel topping can be made several days in advance. Store it in an air-tight container in the refrigerator.
Sauté the apples:
Melt the butter in a heavy large skillet over the medium-high heat. Add the brown sugar. Cook until a grainy sauce forms, about 1 minute. Mix in the apples. Cook until the apples are tender and the sauce is reduced to glaze, about 7-10 minutes, stirring often. Add the zest and spices. Cool completely.
Assemble and bake the pizza:
Top the shaped pizza dough with the apples leaving 1-inch border around. Brush the crust with melted butter. If there’s any butter left, drizzle it over the apples. Sprinkle the Demerara sugar over the crust and the apples. Slide into the 500 F oven for 8 to 10 minutes, until the crust is puffed and nicely browned. Take the pizza out of the oven, transfer to a cutting board. Turn the oven off and slide the baking sheet with streusel crumbs into the oven to warm them slightly, for 1 to 2 minutes. If the streusel was made in advance and kept in the refrigerator, let it stay in the oven a minute longer. Top the apples with streusel crumbs and serve with sour cream.
For the Roasted Garlic Sun-Dried Tomato Pizza with Roasted Onions, Red Peppers and Feta:
- 2 large heads of garlic, whole and unpeeled, the tops sliced off – cloves exposed
- 1 large red onion, peeled, cut into thick wedges
- About ¼ cup extra-virgin olive oil, divided
- Salt and freshly ground black pepper
- ½ cup coarsely chopped sun-dried tomatoes packed in oil, drain the oil before chopping the tomatoes
- About 1½ cups (100 g) grated mozzarella cheese
- 1 large red pepper, charred on/under the grill, cooled, seeded, peeled and cut into ½-inch strips
- About 1 cup (100 g) crumbled feta
- ¼ cup chopped fresh basil
- ¼ cup chopped fresh parsley
Make the pizza:
Preheat the oven to 375F. Place the onion wedges into a large roasting pan. Drizzle with about 1½ tbsp of oil, season with the salt and pepper, toss well to coat the onions with oil. Free a small space somewhere in the corner of the roasting pan and nest the garlic heads inside. Drizzle the garlic with about 1½ tbsp of oil. Roast the onions and garlic for about 30 to 35 minutes, stirring the onions after first 20 minutes. The onions should become tender and lightly caramelized, the garlic should be very soft and golden. Remove from the oven, cool.
Increase the oven temperature to 500F.
In a food processor, combine the chopped sun-dried tomatoes and squeezed roasted garlic cloves. Process, adding the rest of the oil if necessary, to produce fairly smooth paste. The sun-dried tomato and garlic spread can be made 1 day ahead and kept refrigerated.
Spread the sun-dried tomato and garlic paste evenly over the shaped dough leaving 1-inch bare border. Sprinkle the mozzarella cheese, followed by the roasted onion wedges, grilled pepper strips, and then feta. Bake the pizza for 8-10 minutes until the crust is puffed and golden brown, and the cheese bubbles. Transfer to a cutting board. Cool for 2 minutes. Top with the fresh herbs and serve. I don’t recommend to sprinkle the fresh herbs before baking since the oven temperature in this particular baking method is extremely high, and the delicate herbs, most likely, will be burnt.
For the Hazelnut and Honey-Thyme Roasted Pear Pizza:
- ½ cup toasted coarsely ground hazelnuts
- 4 large Bartlett pears, peeled, cored, thinly sliced
- 2 tbsp unsalted butter, melted
- About ¼ cup honey, divided
- About 10 thyme sprigs + a little bit more thyme leaves (for garnish)
Make the pizza:
Sprinkle the hazelnuts over the shaped pizza dough. Arrange the pear slices over the hazelnuts. Brush the crust and the pears with melted butter. Drizzle about 2 tbsp of honey over the pears. Place the thyme sprigs onto the pears. Slide the pizza into the 500 F oven for 8 to 10 minutes, until the crust is puffed and nicely browned. Take the pizza out of the oven, transfer to a cutting board. Discard the thyme sprigs. Warm the remaining 2 tbsp of honey and brush over the pear slices. Sprinkle with fresh thyme leaves and serve.

October 29, 2008 at 11:48 pm
I think these are the best three pictures and tasting pizzas, Great work for this month’s DBers challenge.
October 29, 2008 at 11:43 pm
The cinnamon streusel pizza sounds amazing. Which one should I try first with my leftover dough?
October 29, 2008 at 9:05 pm
Thank you, everybody, for stopping by and leaving the comments! I don’t have enough words to express my gratitude! I am really touched and flattered. Thank you very much!
October 29, 2008 at 8:58 pm
Vera, all pizzas are pretty and neat. I also made 3 pizza, but only use one flavor as I was too lazy at that day. :D
I did toss and had fun with one pizza, and agree with you that stretch the dough with the fists is more uniform.
October 29, 2008 at 6:36 pm
Everything you make is just so darned pretty! How do you do that?!!? I wouldn’t want to mess up your pretty pizzas by eating them, lol.
October 29, 2008 at 6:25 pm
those pizzas lloks awesome, can have them for dessert and main course too! fantastic!
October 29, 2008 at 6:20 pm
*whispers* I don’t like pizza, but the pictures are so so pretty…. can we have the recipe for your nana’s cabbage pie? Oh, that sound so good right about now!
October 29, 2008 at 6:08 pm
That Hazelnut/pear one is GORGEOUS and looks like it would be DELICIOUS. Such a great job you’ve done here.
October 29, 2008 at 5:06 pm
I think I’d forego my dislike of cheese for the 2nd pizza up there…oh my gosh it’s all my favorite sandwich toppings on a pizza. Your crusts look perfectly crispy :-) I’m in heaven just looking at your pies!!!! Awesome!
October 29, 2008 at 4:04 pm
Beautiful! I am so impressed by your three pizzas! I wish I could inhale them through my laptop screen :).
October 29, 2008 at 3:44 pm
Vera – Your blog has been a favorite of mine for a long time now…I love it! Your apple streusel pizza has inspired me to try it…I can’t wait!
October 29, 2008 at 3:27 pm
I’m slowly running out of superlatives for your wonderful works of art! All of your pizzas look amazing and I really love the flavors you’ve chosen. GREAT photos, as always!
October 29, 2008 at 3:07 pm
What lovely pictures. What a lovely blog. What lovely pizzas! Wow, I am super impressed with it all. You did a terrific job! I will come back and visit often.
October 29, 2008 at 1:22 pm
beauties. they look like jewels :) You always make wonderfuls things in your Kitchen Vera :)
October 29, 2008 at 12:01 pm
My oh my!! You really out did yourself on this one. I am drooling over all of the pizzas!!! I really like the cinnamon one!
October 29, 2008 at 11:02 am
Oh how I love your pictures! They make me so hungry and your styling is just fantastic! Great, creative pizzas. All these different flavors are so intriguing…I’d love to sample them all!
October 29, 2008 at 10:43 am
What gorgeous pizzas, Vera! You’re incredible. Loved your comment about “the boys”. My husband and I got a good laugh out of that!
October 29, 2008 at 10:28 am
I don´t know what pizza I would like to eat inmediately but I´m sure… all of them!!!
The pizzas look so good and delicious.
ana
October 29, 2008 at 9:09 am
yum, your apple pizza looks so good. I wish I would have made a sweet pizza. fabulous job on everything!
October 29, 2008 at 8:55 am
Lovely pizzas, your pictures are very beautiful!
October 29, 2008 at 8:25 am
Wow, the hazelnut pear pizza sounds amazing. They all look fantastic. I made the “quick, let’s make a sloppy but yummy dessert pizza” version of your apple streusel.
October 29, 2008 at 8:16 am
All of your pizza really look beautiful. They’re almost too beautiful to eat! I especially like your hazelnut-pear pizza.
October 29, 2008 at 8:09 am
My goodness, look at how amazing you are! I’ve got three dough balls left in the freezer and I’m most definitely trying out that Cinnamon Apple Streusel – to die for!
October 29, 2008 at 8:09 am
wow, your pizzas look so delicious!
October 29, 2008 at 8:06 am
Gorgeous pizzas!! They all sound so fabulous! Can I have a slice of each? :)
October 29, 2008 at 8:05 am
What wonderfully creative toppings! They all look amazing. I think the pear hazelnut is my favorite, as I love both flavors.
October 29, 2008 at 7:46 am
All your pizzas are stunning wow! I want to eat them all!
October 29, 2008 at 7:36 am
all your pizzas look lovely. Great job.
October 29, 2008 at 7:00 am
Your pizzas look amazing. I have to admit that I just stuck with the plain tomato and cheese toppings but after seeing some of the more exciting toppings I might have to try them out.
October 29, 2008 at 6:38 am
Great job. All three pizza’s look and sound delicious. I did a pear topping on mine too and it was delish!!
October 29, 2008 at 6:32 am
The Honey Thyme with Roasted Pear pizza is my favourite but they all look wonderful. Great job!
October 29, 2008 at 6:00 am
Your pizza look delicious !
October 29, 2008 at 5:58 am
Your pizzas and the pictures simply look amazing. Absolutely delicious .. I’m now hungry! :)
October 29, 2008 at 5:27 am
Mmmmm your pizzas look fantastic!! I could really go for a slice of the pear one :)
October 29, 2008 at 4:39 am
oh vera, beauties these are! i wasn’t able to make this challenge but seeing your photos is making me so jealous…
October 29, 2008 at 4:31 am
Beutiful! Thanks for sharing
October 29, 2008 at 4:30 am
Vera, your pizzas are perfect! The shape, the toppings… I always enjoy your posts so much!
October 29, 2008 at 3:18 am
Such beautiful and mouthwatering pizzas!!
Especially the second one (roasted onions etc..) which sounds much more appealling to my taste (I’m more of a “salt tooth” (?)!)
October 29, 2008 at 2:25 am
Your pizzas look absolutely fantastic and scrumptious! Wow, mindblowing! You did a great job here!
Cheers,
Rosa
October 29, 2008 at 2:10 am
Your pizzas look so gorgeous! I love the sound of the pear, hazelnut and thyme one, mmmm.
October 29, 2008 at 2:01 am
Absolutely gorgeous, you did such an awesome job!
October 29, 2008 at 1:59 am
Delicious pizzas!!! I’m bookmarking this for my next pizza night! Great job!
October 29, 2008 at 1:54 am
Absolutely gorgeous! Every single one looks amazing. Would’ve loved to have had a slice of each!
October 29, 2008 at 1:38 am
All three look fantastic, but if I really had to choose one, I would pick the pear/hazelnut version.Yum !
October 29, 2008 at 1:08 am
I can’t decide which of the three I like the most – all of them are beautiful and look delicious. Great work and wonderful photos.
October 29, 2008 at 12:16 am
Ooooo…It’s love at first sight for me and your sauteed apple and cinnamon streusel pizza!! I bet it tasted just like a good apple pie, just better!!
And I love the elegance of your roasted pear and honey-thyme pizza! I bet the hazelnut added the perfect, hidden layer of flavour between the pears and the crust!
And the robust appearance of your savoury pizza! I don’t usually go for savoury but I’m sure I’d love this one!
October 29, 2008 at 12:10 am
Just wow, love all three of them.
I’m sure my tossing will be hysterical, have the dough balls ready and will try tossing this afternoon.
October 29, 2008 at 12:08 am
Beautiful pizzas!
October 29, 2008 at 12:08 am
OMG these look amazing. I m just melting on my chair with the view of these great pizzas. You re great.
October 29, 2008 at 12:05 am
Vera, all your pizzas look amazing. I’m glad your tossing moment was historial, as mine was certainly hysterical! :D