Checkerboard Cookies

Checkerboard Cookies

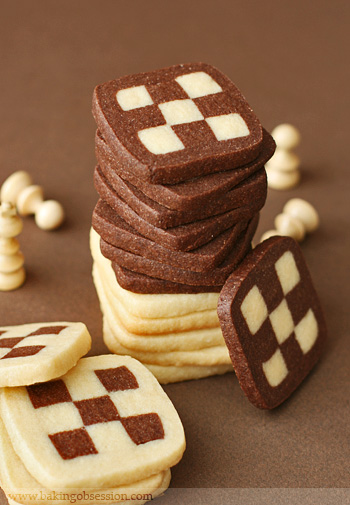
This is an old classic, not really original – just simple chocolate and vanilla dough put together. Yet it always surprises me how people react when I offer them the cookies (or maybe they are just easily impressed here :) Kids simply go crazy over them.

The recipe below makes an enormous amount of cookies. But it’s easier to work with a fair amount of dough. It’s good to have plenty of it to wrap the checkerboard logs around with rather than trying to patch small pieces together or rolling the dough thinner that it’s supposed to while sweating profusely during the process.

This sort of cookies is a good choice for a holiday gift. The formed logs can be wrapped tightly, frozen for up to a month, and baked later as you need them. And this is the only way of freezing the cookies I advise. I never freeze the baked cookies. And neither should you! The best cookies are the freshly baked ones!

Makes about 8 dozens

Ingredients:

  • 5 1/3 cups all-purpose flour
  • 1 tsp baking powder
  • 1 tsp salt
  • 1 lb (2 cups or 4 sticks) unsalted butter, at room temperature
  • 2 cups granulated sugar
  • 1 tbsp pure vanilla extract
  • 2 large eggs, at room temperature
  • ½ cup unsweetened cocoa powder

Preparation:

Sift together the flour, baking powder, and salt. Set aside.

In a large bowl, using an electric mixer, beat the butter and sugar together until light and fluffy. Beat in the eggs, one at a time, then vanilla extract. Add the flour mixture and mix to combine. Finish the mixing with your hands or a wooden spoon.

Divide the dough in half. Knead ½ cup of cocoa into one portion of the dough.

Divide the chocolate and vanilla dough in half. Form each of total four portions into a rectangle, wrap individually in plastic, and refrigerate for at least 2 hours and up to a day.

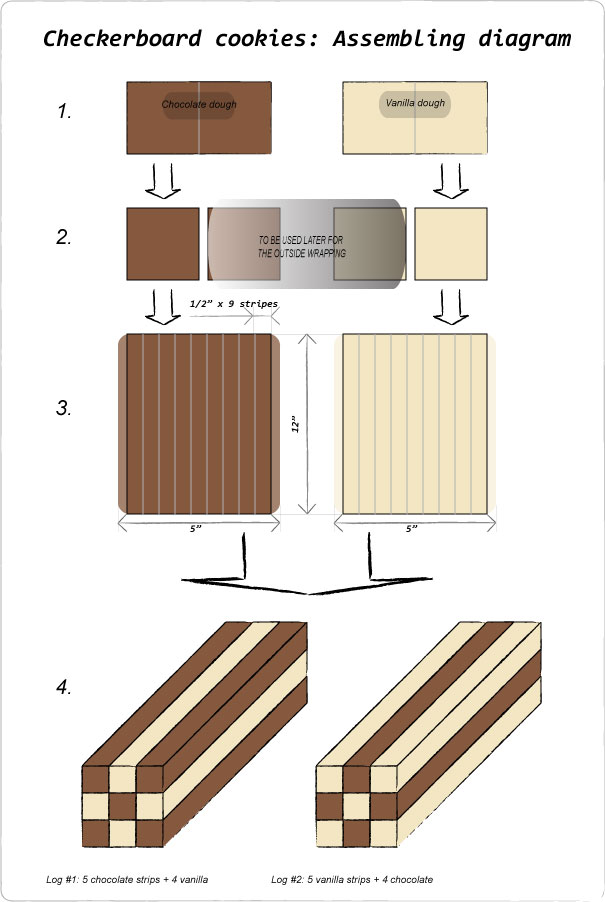
Before proceeding, take one portion of the chocolate and one portion of the vanilla dough and let them sit on the counter for about 15-20 minutes to soften slightly. On parchment paper (preferred) or a lightly floured surface, using a floured rolling pin, roll one portion of the vanilla and one portion of the chocolate dough (separately, of course) into ½ -inch thick rectangles, with the sides about 12 x 5 inches long. Using a pizza wheel (such a wonderful tool for this job) cut out total of 9 ½ -inch wide strips from the each dough. Handling the strips delicately, form two checkerboard logs alternating the chocolate and vanilla strips (see the photo of the finished cookies). I never use an egg white or water to adhere the strips one to another. If you don’t use a lot of flour during the dough rolling it’s not necessary, everything stays together without any problem. Cover with plastic wrap or parchment paper and refrigerate until firm, at least for 2 hours.

When ready to continue, on the parchment paper roll the remaining chocolate (or vanilla) dough into a rectangle about 1/3-inch thick and measuring 12 x 6 inches. Place the firmed checkerboard log into the center, long sides parallel, and with aid of parchment, wrap the dough around the checkerboard log pressing firmly to adhere. Roll the finished log from side to side to form sharp corners. Wrap in the parchment and/or plastic and refrigerate well. The best would be to leave the formed cookie log in the refrigerator overnight. Don’t rush if you are after the uniform shape of the cookies. Repeat with the rest of the dough and the second chilled checkerboard log to form another, opposite in colors, cookie log. Wrap, place in the fridge. As I mentioned, you can freeze the logs. Thaw them overnight in the refrigerator before using.

When ready to bake, center an oven rack and preheat the oven to 350F. Cover a large baking sheet with parchment or a silicone mat. Using a very sharp knife, slice the cookie-dough log into ¼-inch thick slices. Place on the prepared baking sheet leaving about 1 inch all way around them. Bake the cookies, in batches, for about 12 minutes until firm and golden brown on the bottom. Don’t let them bake for too long, or the color contrast between the chocolate and vanilla dough will be lost. Cool on a baking sheet on a rack for 15 minutes. Then transfer the cookies to the rack and cool completely.

Update: I sketched a little diagram explaining the process of assembling the cookies. Please click to enlarge.

Checkerboard Cookies: Assembling diagram

Page copy protected against web site content infringement by Copyscape

Print this recipe...

Bookmark and Share       AddThis Feed Button

64 Responses to “Checkerboard Cookies”

  1. So cute! Those cookies look perfect! I love your picture!

    Cheers,

    Rosa

  2. These are so beautiful. It looks and sounds time consuming but well worth it!

  3. Wow…mind-blowing…! Well done Vera!

  4. They look so pretty and perfectly shaped!

  5. These are so perfect looking. I’d probably get something more resembling Chutes and Ladders. Beautiful job.

  6. I’ve made these before and they looked nowhere near as nice as yours…but they are so cute I want to try again!

  7. Bravo!!! Look so pretty and so delicious. I´m making these cookies, nest weekend!!

    Beautiful photos, Vera!!

    Ana

  8. hi the cookies look great!!!

    but how much butter did you
    exactly use
    thanx

  9. Rosa, thank you!

    Honey B, thank you! This is just a long description. I wouldn’t call them time consuming.

    Sonu, thank you very much!

    Patricia, thank you!

    Lisa, thank you! I’m sure yours would look great :)

    Cate, thank you! I’ll be glad if you give them a try :)

    Ana, thanks a lot! It’s great you are making them!

    Gilat, thanks! I used 1lb of butter which is 454 g, to be exact.

  10. ahk! those are solid perfection. bravo.

    photo is brilliant. nice little pawns in the background. hehe. light contrast back, light contrast front. woooo.

  11. I had allready spotted them next to the hot chocolate! They’re so simple yet impressive. Yours turned out perfect!

  12. They’re beautiful! You might consider them simple, but not everyone can turn them out as perfectly as that, I’m sure :)

  13. Oh these cookies are stunning. But they intimadate me. So I will leave the baking of these cookies to you!

  14. I don’t blame people for going crazy for those cookies, they look so picture perfect! I definitely think it takes a special kind of skill to make things come out like that. Just beautiful!

  15. Wow, I’ve never seen anything like this before, this is awesome! Reminds me of a chess board. :) How did you get the squares to be so perfect.. and the wrap-around part so neat… wow!

  16. I agree with Y. Not everyone is favoured by the pastry gods, you know. So, any leftovers?? ;)

  17. Lovely cookies (another “must try” ones) and original photos (love the chess figurines behind).

    Me encanta cómo quedaron estas galletas (otras que me encantaría probar) y sobre todo cómo has montado las fotos, con los peones de ajedrez detrás, me parece una puesta en escena original y creativa, me ha gustado mucho.

  18. what a process, but more importantly, what a spectacular result! now all you need is little morsels (white and dark chocolate, of course) to use as pieces! :)

  19. These really are impressive cookies. I loved them in the photo with the hot chocolate.

  20. Love these cookies! I am sure they would be fun to dunk in milk!

  21. amazing :) they re perfect. Great job. Wish to try these but I m sure they eon t come perfect as yours

  22. I always think these cookies are sooo cool!
    They look like they would be comlicated to make though.

  23. Those look beautiful - worthy of any great bakery!

  24. these look so incredibly professional. i love that they yield so many cookies. i’ve read your instructions TWICE and i am still {whispers} confused. i must have to be actually doing the activity to get it but from my office desk right now, i can’t visualize all the steps. not only am i scared to tackle this cookie, i am compelled to conquer it.

    thank you for sharing the recipes and steps!

  25. Mallory, thank you! I’m very flattered.

    Rita, thank you! They are simple, indeed.

    Y, thank you very much! I’m pretty sure everyone can accomplish this :) But, thanks for your kind words :)

    Leslie, thank you! Too bad they scared you. Actually, the whole process is not difficult at all. It’s just the long description.

    Andrea, thank you very much for the complement! They don’t require any special skill, just a bit of patience.

    Irene, thanks a lot! It’s not difficult to archive the uniform squares. Roll the dough to the same thickness, use a ruler (not totally necessary if you have a sharp eye or don’t have the ruler:), and chill the formed logs well before slicing.

    Christy, thank you! All leftovers are gone by now :)

    Morgana, thank you very much! I can’t figure out how to leave comments on your blog… I’ll try again.

    Grace, thank you!

    Eileen, thank you! Everyone loved them with hot chocolate :) They go together pretty well.

    Maria, thank you! That’s what my little son did :)

    Natalie, I’m sure they will come out perfect, as everything you make!

    Ivy, thank you! They are not complicated. If there’s anything unclear, please, ask.

    Chocolate shavings, thank you very much!

    Lan, thank you! I could e-mail you a sketch to help in visualizing the process. Please, let me know if you need it.

  26. I recently was looking at a recipe book with these. I am convinced now that they need to be part of HOliday baking repertoire. Those are great looking cookies. Lets hope I can duplicate!

  27. I haven’t made refrigerator cookies in years. You’re so right that they’re perfect for the holidays — lots to share with everyone and they box quite well. Your checkerboards are just perfect!

  28. Classics are the best! You did a lovely job with these, so pretty :). Definitely a fun holiday party food!

  29. a classic made to perfection!

  30. Classic Beauty, I am sure it delicious too!

  31. Oh my effing gosh. We always made these around Christmas time, especially in Germany. You have really been cooking some things that make me want to dive into a bed of Christmas. They definitely do have a look to them that can be somewhat deceiving, giving it a look that a lot, a lot of work went into constructing them. I love them. :}

  32. I always wondered how this was done. I can just see myself confused and mixing up the layers. Trust me, I have mixed up all sorts of things, only to start over. At least with these, I could eat the mistakes.

  33. These are perfect with the hot cocoa from your previous post. I think they are a wonderful cookie to have on hand..sophisticated for the adults and perfect for the children.

  34. When I saw these with your coffee post I was hoping you would follow up with the recipe! The cookies are just as pretty alone as they were on the coffee saucer! :)

  35. Oops.. hot chocolate! :) :)

  36. The reason why people are impressed is because you made them just perfect. Perfectly square and perfectly baked. Even though I’m not a big fan of the flavours, I would love to bite in one of those perfect cookies :)

  37. Why do you say they are an old classic ? This is the first time I see cookies like this ! I will certainly make them in a close future.
    Anne

  38. Simply amazing. Can you perhaps give a small sketch of the different steps ?

  39. yes, if you could email me a sketch, i would be ever so grateful! altho i see that someone else has asked for it as well … i’m so excited about trying this recipe!

    thank you thank you thank you!

  40. I’m so impressed by how perfectly patterned these are!

  41. hello vera–yes very first macaron! thank you so much for the compliment, i have no idea why but out of everything i had always been so nervous to try making them! :)

  42. I have tried to give up the expression, “OMG”, but I simply can’t help myself from at least thinking it when I see these. Seriously, could they be any more perfect?

    Fantastico!!

  43. these are GORGEOUS! i love that you wrapped the outside of them, too!

    i have made them for many years, including in a commercial catering kitchen where i had to make thousands of them at a time, and i offer the following trick for getting the layers even: use a pair of dowel rods. choose whatever width of dowels you would like for the individual layers to be (i use quarter-inch ones) and cut them to 12-14 inch lengths. put them on either side of your piece of dough on the counter and start rolling. when the rolling pin comes to rest on the dowels, you have reached the perfect thickness! repeat for each piece of dough and you will have everything the exact same height.

  44. Yes it is a classic, but hello? You made them absolutely perfect!! I made some the other day and they looked nothing like this!!

  45. Gorgeous - these remind me of some that Payard made in one of his earlier books, Simply Sensational Desserts. But yours look even better!

  46. Thank you very much, everyone, for your lovely comments!

    Maya, Lan, I sketched a diagram explaining the process of assembling the cookies. I’ve placed the link at the end of the recipe. Hope this helps. If there are more questions - do not hesitate to ask!

  47. thank you so much for posting the diagram. i ended up reading the instructions a few more times and that’s pretty much what i had envisioned in my head. this confirms it! :) i’m sure i’ll be messing up but i think these cookies will be made a few times this year so eventually i should get it right.

  48. Lan, you are very welcome!

  49. Thank you so much for the sketch.I hope I get it right but ofcourse it won’t come anywhere close to yours !!!

  50. Maya, you are welcome! I’m sure they will come out just great!

  51. Vera, these cookies are so gorgeous looking! There has never been a product of yours that hasn’t stunned me with its beauty and tastes combination!

  52. I’ve made these before but yours are perfect.

  53. [...] reproduce the recipe here, only because it’s been done as well as it could be over at Baking Obsession, complete with step-by-step instructions and tips and, also, that very handy diagram you’ll [...]

  54. Miri, Aparna, thank you so much for your kind words!

  55. hi Vera — me again. i had a question … again! about these cookies. i’d like to make an xmas version, and rather than using chocolate powder, i’d like to turn that part red. as of Tuesday, i am unemployed so i’d like to spend tomorrow playing with this dough. could i use red food coloring and not have to buy something special to turn it red? sorry for bugging you again! thanks!

  56. Lan, sure you can use your food coloring. Add it gradually kneading into the dough until you get color intensity you want. Or you can try to add some beet juice instead :)

  57. Amazing!! And beautifully done!!

  58. Vera, congratulations on winning DMBLGIT!

  59. Vera, I’ve seen your cookies on Dessert Magazine, Bravo!!!

  60. and congrats on DMBLGIT too… :D

  61. Mycookinghut, Marija, Thip, thank you very much!

  62. Vera,

    Honestly I haven’t seen such a beautiful checker-board cookies ever. Only day before I bought some from my local bakery and they were nothing like this. The log formation sounds a bit confusing to me but i suppose if i make them i’ll understand the process. Thanks for the wonderful step-by-step picture.

  63. I made some yesterday. They’re not as pretty as yours though.

    http://aw-nuts.livejournal.com/704.html

  64. I have made similar cookies such as these for years, but in a much more rudimentary design. I think these are GORGEOUS and am looking forward to stepping up the look of our holiday favorites.

    I’m so glad I stumbled upon your blog….I will definitely be back.

    Happy New Year!

    Kate

Leave a Reply


Home page | About | Contact | Links | Archives | Awards | Subscribe


The whole site is protected by Copyright.
It is forbidden to reproduce any part of this site, in any form, without prior written permission from the author.

© Copyright Baking Obsession 2007-2008