I’m posting the recipe and step-by-step instructions for making the chocolate plastic roses. Maybe someone will find this information useful. I really do like the chocolate plastic as the cake decor. It is easy to work with, looks great, holds its shape, and it is way tastier than fondant. Of course, you can make different things from the plastic, just use your imagination.
Makes enough to make about 4-6 large flowers
Ingredients:
- 8 oz white (or milk) chocolate, finely chopped
- ¼ cup (4 tbsp) light corn syrup
Important note: The milk chocolate can be substituted for the white. But if you wish to make the flowers from the dark (bittersweet or semisweet) chocolate, use a different proportion: for every pound of the dark chocolate, take 2/3 cup of the light corn syrup. Preparation is the same.
Preparation:
Bring 1 inch of water to a simmer in a wide skillet. Turn the burner off (if your stove is electric, remove the skillet from the burner) and wait for 30 seconds. Meanwhile, place the chocolate in a medium heatproof bowl. Set the bowl of chocolate in the hot water. Stir constantly until the chocolate is melted and smooth.
Off the heat; add the corn syrup and stir with a wooden spoon until the mixture thickens and pulls away from the sides of the bowl.
Transfer the chocolate mixture onto a piece of plastic wrap and pat it into a thin disk, about 6 mm thick. Fold the plastic wrap over the chocolate and refrigerate for at least a couple of hours or up to several weeks (check the expiration date on your chocolate). It is preferable to let the chocolate plastic rest in the refrigerator overnight.
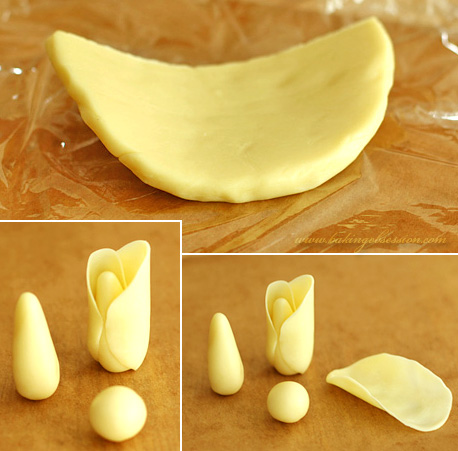
Take the chocolate plastic out of the refrigerator. Leave it on a counter for 30 minutes to soften slightly. Knead the plastic with your hands to make it smooth and pliable before you start (it might appear grainy at first, but the kneading will change it).
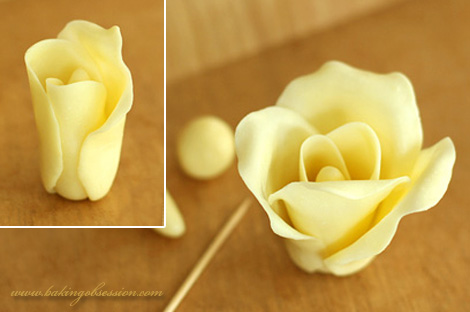
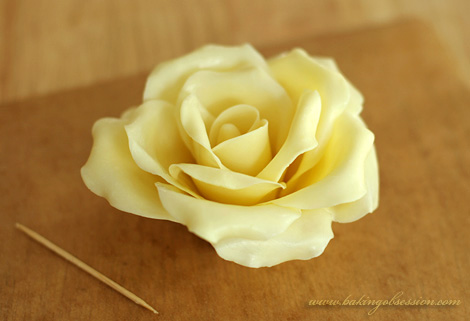
Shape a small piece of the chocolate plastic into a cone – it will be a flower base. Then form another piece into a small ball (about ½-inch in diameter) rolling it in the palms of your hands. Pat the ball, between two plastic bags (like Ziploc), or between two layers of plastic wrap, into a thin petal. Refrigerate the petal, still between the plastic wrap, for a minute (to firm the chocolate plastic and make it easier to handle). While one petal is chilling, form another one for the continuous process. Take the chilled petal out of the fridge. Carefully peel the plastic wrap and attach the petal to the cone base. Wearing thin, surgical-type gloves helps significantly. Attach another petal to the base overlapping the petals slightly. Make the closed bud first, then start attaching the open petals around. Curve the petal edges gently outward using a toothpick. Repeat the shaping, chilling, and overlapping the petals until you get the desired size and shape of the flower.
Refrigerate the finished chocolate rose until firm, cover loosely with plastic wrap and keep in the fridge until needed.
You probably won’t use all plastic at once (it makes a lot). If you have some leftovers, invite the kids into the kitchen. They love this edible chocolate play-dough.